For me, the beginning of a New Year is always an opportunity to look back at the past and reflect on the happy memories in my life. It could be anything really, from as far back as my childhood or even something more recent, but somehow something about the new promise of a new year always inspires me. This year, I’ve been thinking a lot about my happy memories with my son, Edgar. He’s already 10 years old and I can’t even begin to tell you where all of the time has gone.
It seems like only yesterday we were experiencing all of his firsts together. They were my firsts too, actually…and I’m not really sure I’m quite ready to let any of them go into the past just yet. So, of course, I had to turn them into a project!
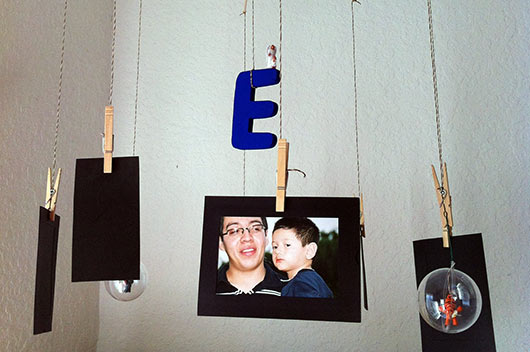
Crafting a personalized children’s mobile for Edgar became my new creative mission. He’s too big to let me hang one of those infant or toddler mobiles over his twin sized bed, not to mention it probably wouldn’t make much sense for a fourth grader to have one anyway. But the more I thought about it, the idea of creating a personalized children’s mobile for him myself made perfect sense. Who else but me would know exactly what he likes and which memories are the ones that bring him the most joy? They don’t sell that at the stores just yet! So here are the materials and steps I took to create his mobile, and here’s how you can create your own, today.
Read Related: 10 Gift Ideas Using Your Children’s Artwork

HOW TO MAKE A MOBILE WITH YOUR KIDS’ MEMORIES
Materials
Ruler
Compass
Protractor
8 wooden dowels
Wooden embroidery ring
Wooden circular disk
Glue (wood glue is best, but any kind can be used.)
Clothes pins
Hemp cord
White plastic ring
Hook screws
Large metal clasp with a rotating metal attachment (as shown; this allows the mobile to move on its own)
ASSEMBLY
Step 1. Look for the center of your disk. In my case I’m using a wooden cap as my disk, but you can pretty much use any other materials you like as well.
Step 2. Using a pencil, separate your disk into eight equal parts by marking them as shown. Draw a circle in the center as well.
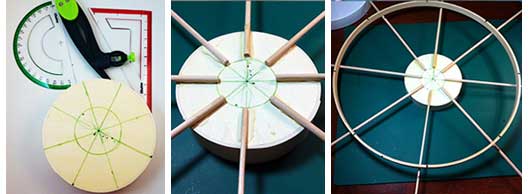
Step 3. Now, take the wooden dowels and glue them to the eight marked lines on your disk making sure you do not cross the circle you drew earlier at the center of your disk. Allow time for the glued areas to dry.
Step 4. Next take your wooden embroidery ring and glue it to the eight wooden dowels already attached to your disk. You can use your hemp cord to tie a knot around the ring and each of your eight dowels where they meet in order to hold them in place while they dry. Once dry and secure cut off the hemp cord.
Step 5. Cut four pieces of hemp cord in equal length. These will be used to hang your mobile when complete. Tie each piece of hemp cord to every other wooden dowel on your mobile as close to the center disk as possible, skipping one in between each knot. This will give your mobile balance once it is completed and hung up.
Step 6. Tie your four loose pieces of hemp together at the top and then attach them to a hook screw. When complete you will hang the mobile to the large metal clasp with this hook. (Alternatively, you can also attach hook screw directly to your wooden disk).
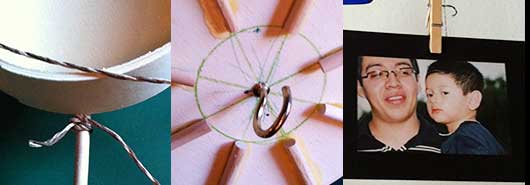
Step 7. Cut eight semi-equal pieces of hemp cord. These eight cords will be the portion of the mobile that hangs lowest and that will hold your mementos. Make sure you measure your eight cords according to how far down from the ceiling you want them to hang.
Step 8. Now use clothes pins to attach special pictures or other mementos onto your mobile. Tie the loose end of your eight hemp cords to eight clothes pins to hold them in place.
Step 9. Cut a single piece of hemp cord and attach it to a white plastic ring. You can attach the other end to your metal clasp, giving your mobile more length if you will be hanging the mobile from a very high ceiling. Remember that if you do not need the extra length, you can simply attach a hook screw to your wooden disk.
Step 10. Finally, hang up your personalized children’s mobile in your child’s bedroom or play room and enjoy!
I hope you have as much fun putting this mobile together as I did!
If you have questions about this or any other of my crafting projects, feel free to reach out to me online at on Facebook or Twitter.

