
A step by step guide to make Mexican inspired hair bows for you and your girls.
From the very first time I set my eyes on ribbons and bows, I was in love. They are so pretty and versatile, and they are a sweet reminder of my Mexican culture. These days though, I can’t really get away with wearing all of the bows I used to as a young girl. Well, I could…but it’s just not my style anymore. Plus what would people think when they saw me sporting a huge red bow at the grocery store? Hmm, that may be a good social experiment down the line…
For now, my nieces are the lucky ones—or unlucky ones depending on how you look at it—who get to wear all of the hair pieces I dream up. But even they’re getting to that age where they don’t want to be my mannequins anymore. Sigh… Anyway, in this post, I’ll show you how easy it is to use our own cultura to make some pretty fun bows for the young girls in your life.
As an extra challenge, I’m making my own ribbon to make these bows. They just don’t craft enough Mexican-inspired ribbon these days, and besides, you know me; I love to reuse, re-purpose, thrift, consign, and all that other good stuff!
Read Related: Sharing Our Hispanic Heritage Pride & Bilingual Advantage
We’ll be using the ribbon/bow making technique known as stacked/layering hair bows to create our special Mexican-inspired hair pieces.You don’t really need a lot of materials; any old clean fabric can be used as your canvas. I’m using an actual bed sheet to make my ribbon. For this project you will also need a couple of image transfer sheets, an iron, and liquid starch. That’s pretty much it. Let’s get started!
RIBBONS & BOWS 101

Step 1
Since we’re making our own Mexican-inspired ribbon, you’ll want to select the images you want on your ribbon ahead of time. Once you’ve decided, use a printer to print these images onto your transfer sheets. Depending on the size of your images and how many of them you want on your ribbon, you may need more or fewer transfer sheets. Use the instructions on the transfer sheets package to properly print your images.
Step 2
Decide what length and width you want your ribbon to be. The larger the bow, the larger you’ll want your ribbon. Take the fabric you are using to make your ribbon and cut strips in the desired size. Use a ruler to help guide even fabric cuts.
Step 3
Once you have your strips of fabric, use a spray bottle to dampen each strip with the spray starch. You’ll want to make sure to slightly dilute your starch with water before you begin this process.
 Step 4
Now, place the starched fabric strip between two non-starched cotton fabrics and iron it until it is completely dry. Make sure there is no moisture in your starched fabric strip when you are done or your images will not transfer correctly. (Repeat as needed for each strip of starched fabric).
Step 5
Using the instructions provided on the transfer sheets packaging, begin the image transferring process onto your starched fabric strips.
Step 6
Finally, use any hair bow making techniques you know to create your own bows. (YouTube is a great source for learning techniques if you don’t know any). I used a button as the center focus of some of my bows. Make as many bows as you want and have fun with it! Go crazy, as I like to say. Now, here are a couple of techniques on making bows that I have learned along the way.
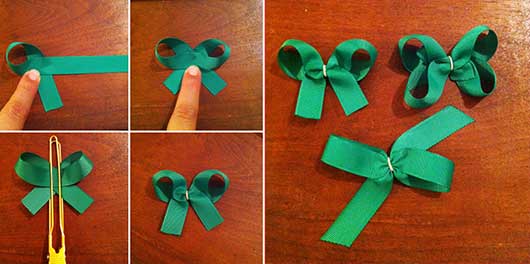
The yellow clip I’m in using in the photo above is actually a hair clip that would normally be used to hold hair in place.You can find this style of hair clips at any beauty supply store. I am using it to hold my bow in place while I use both hands to tie together the center of my ribbon with a piece of string. I’m using a different colored piece of string, but you will probably want to use a piece of string the same color as your ribbon. To make sure the ends of your ribbon do not fray, use a product known as Fray Check. Alternatively, you can also burn the end edges of your ribbon with a lighter.
To hold your ribbons in place as you stack them for your bows, use a fast drying glue like hot silicone glue with a glue gun.
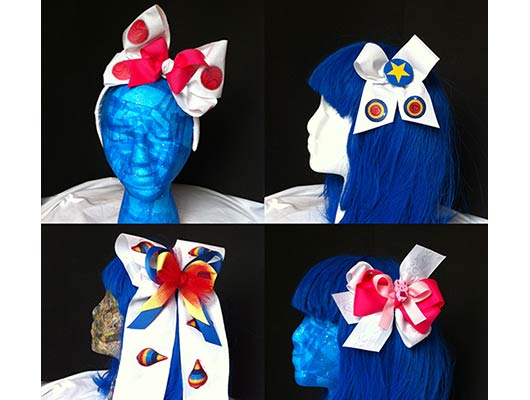
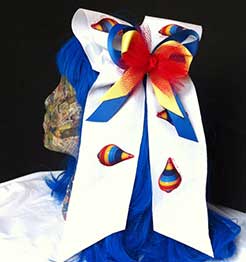
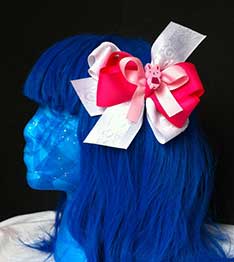 To make extraordinary bows, stack different style and size bows on top of each other and use a lot of different widths and lengths for your ribbons, as well as ribbon designs and patterns.
And finally, enjoy your awesome creations! Wear one of your bows too. I’ll be wearing mine, even if just inside the house—for now!
If you have questions about this or any other of my crafting projects, feel free to reach out to me online on Facebook or Twitter.