
UPDATED January 12th, 2018
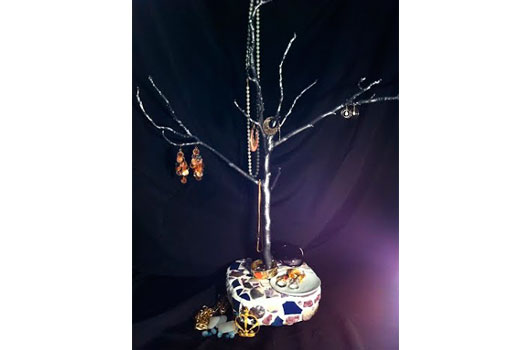
No matter how many jewelry holders I have, it seems I can never fit all of my jewelry on them. That’s not to say I have a lot of it, much less a lot of expensive gems—although that would be nice. But even a modest collection of jewelry always seems to get out of hand when it comes to storage. So if you’re in the same boat as me, I have a solution for both of us—a handcrafted jewelry holder, incorporating natural elements. You can make one too—it’s really pretty fun and easy.
MAKE A JEWELRY HOLDER FROM NATURAL ELEMENTS
First, you need to go outside and find you primary material. I’m talking about a tree branch. Yes, like the ones that grow on trees. They are great for crafting projects like this one. You don’t want a really big branch, though. The taller the tree branch and the smaller its circumference, especially at the bottom, the easier it will be for you to place your jewelry holder in your bedroom or anywhere else in your house.
A few more tips on picking the right tree branch: you want a branch that will be sturdy enough to last, and you have to let it dry out completely before you use it. That may mean letting it sit out for a day or two once you’ve cut it off. If you don’t let your branches completely dry out, your final jewelry holder could become brittle and break. If they grow in your area, I recommend manzanita tree or eagle tree branches, as they keep their flexibility and durability over time.
Read Related: DIY Genius: 8 Garbage Upcycling Projects for Everyday Living
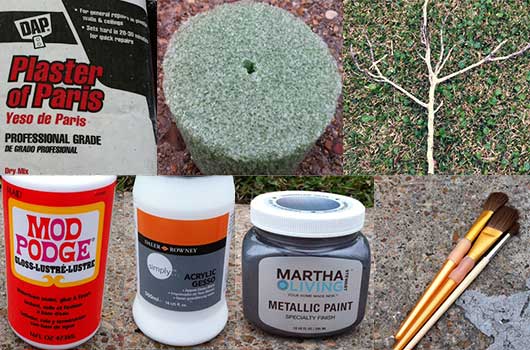
OTHER MATERIALS
- Plaster (I like using DAP brand)
- Small paintbrushes, with fluffy tips if possible.
- Cold water
- A plastic container that you don’t mind throwing away afterwards. Your container should be under 10x10x5 inches, and over 5x5x3 inches.
- A piece of floral foam board slightly smaller than your plastic container.
- Sealant (I use acrylic gesso as a sealant. Mod Podge can also be used.)
- Acrylic paint, your choice of colors.
You can actually make your jewelry holder with only the supplies listed above, but because I wanted something a little bit more flashy I went ahead and added a couple of extras to mine.
OPTIONAL EXTRA MATERIALS
- Broken pieces of ceramic tile, all the same color.
- Flat rocks painted with nail polish.
- Joint compound (patching compound)
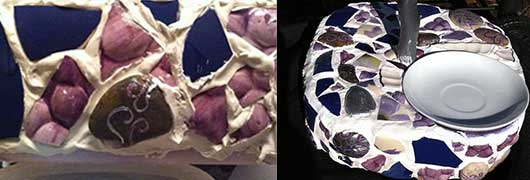
- A small saucer (found at the thrift store for about 40¢).
INSTRUCTIONS
Step 1. In the container, mix some plaster with water as directed on the label, filling the container to about 1/3 or 1/2. While the plaster is still wet, insert your floral foam board in the center. Let the plaster completely dry.
Step 2. Once the plaster is dry, insert the bottom of your tree branch into the foam board as pictured. In a separate container, mix more plaster and pour it into the container with your tree branch, covering the foam board until it is no longer visible (as shown) Let the plaster dry. During this processes you can also insert any small containers you might be incorporating in your jewelry holder. I inserted my small saucer plate in this step).
Step 3. If you just want to paint your jewelry holder and be done, paint the branch and dry plaster with the color(s) of your choice. I used joint compound to add broken pieces of ceramic and flat rocks to the plaster base, as pictured. I also made sure to give the branch a thick coat of gesso with a brush that would get in between crevices and holes in the branch. Then I let that dry before I painted the branch silver. Whatever your preference, let the entire project dry and smooth out any rough edges on the plaster with a piece of cloth and water.
Finally, enjoy your new jewelry holder!
If you have questions about this or any other of my crafting projects, feel free to reach out to me online on Facebook or Twitter.